Homemade Chocolate Truffles Recipe Sallys Baking Addiction
“`markdown
Homemade Chocolate Truffles Recipe | Sally’s Baking Addiction: A Tropical Delight
Introduction to Homemade Chocolate Truffles Recipe | Sally’s Baking Addiction
Are you ready to impress your friends and family with a delightful treat that promises to satisfy any sweet tooth? Look no further than our Homemade Chocolate Truffles Recipe, brought to you by Sally’s Baking Addiction. These truffles are not only decadent and rich in flavor but also incredibly simple to make, making them perfect for busy parents, students, or anyone keen on making quick yet impressive desserts. Whether you’re a baking enthusiast or a novice in the kitchen, this recipe will uplift your dessert game effortlessly.
These bite-sized delights can be crafted to suit various dietary needs, including vegan and gluten-free options. With an array of flavors and toppings, they can be tailored to please any palate, whether you prefer classic chocolate or adventurous combinations. Plus, unlike many store-bought sweet treats, homemade chocolate truffles can be healthier, as you control the ingredients. Dive into this wonderful culinary journey and discover why homemade dessert recipes are the new trend in home cooking!
Benefits and Advantages of Homemade Chocolate Truffles Recipe | Sally’s Baking Addiction
One of the standout features of our Homemade Chocolate Truffles Recipe is its ease of preparation. This recipe involves minimal cooking techniques and requires basic kitchen tools. Within just a few hours, you can whip up a batch of luxurious truffles that will leave a lasting impression. You don’t need fancy ingredients or extensive baking knowledge; all you need is a desire to create something delicious.
In addition to their simplicity, homemade chocolate truffles boast several health benefits. If you incorporate high-quality dark chocolate, you’re not only indulging in something sweet but also choosing a dessert that is rich in antioxidants. Dark chocolate has been linked to numerous health benefits, including improved heart health, lower blood pressure, and enhanced mood. By customizing your ingredients, you can also create low-calorie and sugar-free alternatives, making these truffles a guilt-free treat.
Furthermore, these truffles make great gifts, suitable for birthdays, holidays, or any celebration. You can package them beautifully, adding a personal touch that store-bought sweets often lack. In essence, this recipe is not just about making dessert recipes; it’s about crafting unforgettable experiences tied to delicious, homemade treats.
Ingredients Overview
Essential Ingredients for Homemade Chocolate Truffles Recipe | Sally’s Baking Addiction
To create these indulgent chocolate truffles, you’ll need the following ingredients:
- 8 oz. High-Quality Dark Chocolate (vegan option available)
-
Purpose: The base of your truffles, providing rich flavor and texture.
-
½ cup Heavy Cream (or full-fat coconut milk for a vegan option)
-
Purpose: Adds creaminess and helps to form ganache.
-
1 tsp Vanilla Extract
-
Purpose: Enhances the overall flavor of the truffles.
-
Cocoa Powder, Nuts, or Sprinkles (for coating)
- Purpose: Adds texture and visual appeal.
These ingredients are staples in dessert recipes, ensuring you can easily find them when you decide to whip up a batch of truffles. If you need gluten-free options, ensure to choose certified gluten-free chocolate and substitutes.
Dietary Substitutions to Customize Your Homemade Chocolate Truffles Recipe | Sally’s Baking Addiction
This recipe is highly adaptable. Here are some substitutions to cater to different dietary needs:
-
For Vegan Truffles: Use vegan dark chocolate and replace heavy cream with full-fat coconut milk or almond milk. This ensures a delicious and cruelty-free alternative.
-
For Gluten-Free Options: Always check that your chocolate and any coatings you use are gluten-free. Cocoa powder and many types of sprinkles are usually safe, but double-check labels.
-
To Make Low-Calorie Truffles: Opt for sugar-free chocolate and substitute the heavy cream with Greek yogurt or silken tofu, providing a lighter version without sacrificing richness.
The flexibility of this recipe makes it suitable for everyone, ensuring that no one has to miss out on delicious dessert recipes!
How to Prepare the Perfect Homemade Chocolate Truffles Recipe | Sally’s Baking Addiction: Step-by-Step Guide
Creating homemade chocolate truffles can be a fun and rewarding activity. Follow these steps for perfect results:
-
Prepare the Base: Start by finely chopping the dark chocolate and placing it in a heat-proof bowl.
-
Heat the Cream: In a saucepan, bring the heavy cream (or coconut milk) to a gentle simmer over medium heat, but do not allow it to boil.
-
Combine Ingredients: Pour the hot cream over the chopped chocolate. Let it sit for about 5 minutes. This allows the chocolate to melt beautifully.
-
Mix Until Smooth: Gently stir the mixture until everything is melted together and silky. If needed, you can use a whisk for a smoother texture.
-
Add Flavor: Stir in the vanilla extract, mixing well for an even flavor distribution.
-
Chill the Mixture: Cover the bowl with plastic wrap and refrigerate for about 1-2 hours until the ganache is firm enough to handle.
-
Scoop the Truffles: Once chilled, use a melon baller or spoon to scoop out small portions of the ganache.
-
Shape into Balls: Roll the ganache between your hands to form smooth balls. The warmth of your hands will slightly soften the ganache, making it easier to shape.
-
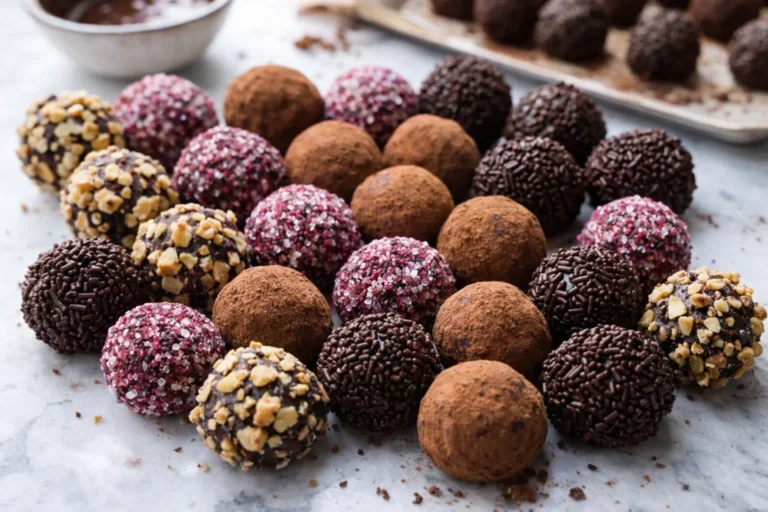
Coat the Truffles: Roll each ball in cocoa powder, finely chopped nuts, or colorful sprinkles. Make sure they are evenly coated.
-
Final Chill: Place the coated truffles back in the fridge for another 30 minutes to set.
-
Enjoy and Store: Your homemade chocolate truffles are now ready to indulge! Store any leftovers in an airtight container in the refrigerator.
Each step ensures that your truffles turn out delicious and satisfying. Feel free to adapt any stage of the process according to your dietary preferences, from the chocolate selection to the coatings.
Mastering Homemade Chocolate Truffles Recipe | Sally’s Baking Addiction: Advanced Tips and Variations
To take your homemade chocolate truffles to the next level, consider these advanced tips:
-
Flavor Variations: Experiment with flavorings, such as espresso powder, orange zest, or flavored extracts to create unique profiles. You can even use spices like cinnamon or chili powder for an unexpected twist.
-
Incorporate Fillings: For an extra surprise, include fillings inside your truffles, such as fruit preserves, nut butters, or caramel.
-
Decorative Toppings: Drizzle melted white chocolate over your finished truffles for a professional finish. Alternatively, roll them in toasted coconut or crushed freeze-dried fruit for colorful coatings.
-
Presentation Matters: When gifting or serving, consider using decorative boxes or unique serving platters. Presentation can elevate even the simplest dessert recipes into something extraordinary.
Using these tips will not only enhance your truffle-making skills but also impress your guests with your creativity!
How to Store Homemade Chocolate Truffles Recipe | Sally’s Baking Addiction: Best Practices
Storing your homemade chocolate truffles properly ensures they maintain their flavor and texture. Follow these best practices:
-
Refrigeration: Place the truffles in an airtight container and store them in the fridge. They can last up to two weeks when correctly stored.
-
Freezing: If you want to extend their shelf life, consider freezing the truffles. Arrange them in a single layer on a baking sheet until firm, then transfer them to a freezer-safe bag or container. They can last up to 3 months in the freezer. Just be sure to allow them to thaw in the refrigerator before serving.
-
Serving Tips: If you plan to serve them at a gathering, take them out of the refrigerator about 15-20 minutes before serving to allow them to soften slightly for the best flavor experience.
By following these storage tips, you’ll ensure that your truffles remain as delightful as the day you made them, making them perfect for indulging anytime or for sharing with loved ones.
Nutritional Value of Homemade Chocolate Truffles Recipe | Sally’s Baking Addiction
Understanding the nutritional value of your homemade chocolate truffles is essential, especially for health-conscious individuals. Here is the approximate nutritional breakdown per truffle (calculated for a standard recipe yielding 20 truffles):
- Calories: 85
- Total Fat: 6g
- Saturated Fat: 4g
- Cholesterol: 10mg
- Sodium: 5mg
- Total Carbohydrates: 7g
- Dietary Fiber: 1g
- Sugars: 5g
- Protein: 1g
Note that these values may vary based on ingredient choices, particularly if you opt for dark chocolate with a higher cocoa percentage or use different types of coatings.
By offering both indulgence and some health benefits, these homemade chocolate truffles can fit well into a balanced diet – especially when enjoyed in moderation as part of your favorite dessert recipes.
FAQs: Frequently Asked Questions About Homemade Chocolate Truffles Recipe | Sally’s Baking Addiction
To help you on your baking journey, here are some frequently asked questions regarding our Homemade Chocolate Truffles Recipe:
Q1: Can I use milk chocolate instead of dark chocolate?
A1: Yes, you can use milk chocolate, but keep in mind that this will alter the flavor profile and sweetness of the truffles. Dark chocolate provides a richer taste and beneficial antioxidants.
Q2: How can I make my truffles vegan?
A2: Use vegan dark chocolate and substitute heavy cream with coconut milk or another dairy-free alternative.
Q3: How long do homemade truffles last?
A3: When stored in an airtight container in the fridge, they can last up to two weeks. If frozen, they can last up to three months.
Q4: What can I use instead of cocoa powder for coating?
A4: You can roll your truffles in crushed nuts, shredded coconut, or even powdered sugar for a different flavor and texture.
Feel free to explore and experiment with variations of this delightful recipe, ensuring you create batches that suit your taste and dietary requirements. Enjoy the process, and most importantly, enjoy the tasty rewards!
“`